Online Sales: How to Guide
Navigating to Online Sales
1.) Click on "Store" in header -> Online Sales
How to Ship Out an Available Item
1.) The word "Available" (quantity 0+) will be displayed on the right hand side of the order indicating that the item is in the inventory. A Quantity of 0 means that the
item is no longer available after this purchase - it indicates that there was a quantity of 1 in stock prior to the order being placed.

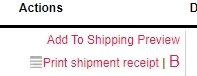
2.) Click "Print Shipment Receipt" to include in the package being sent to the customer.
a.) Select printer with Landscape alignment
3.) Collect items
a.) Verify item, quantity and all other attributes on packing slip (Name, Supplier, Color, Size, Heel Height, Width, etc.) match item being shipped. Make check marks
next to each attribute following verification. Write initials at the bottom of the packing slip.
4.) Click "Add to Shipping Preview"
a.) Verify "Shipping To" address displayed matches the shipping address on the shipment receipt.
b.) Verify "Shipping From" address is correct.
c.) Place items in appropriate packaging and then weigh on the weigh machine. Input weight using pounds and ounces in bottom right side of the screen.

d.) Select appropriate shipping method:
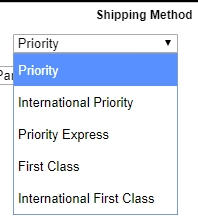
- If the item weighs less than 16 oz., it can be shipped first class in white or manila/kraft envelopes. (i.e. heel caps, tights)
- Items shipped domestically over 16 oz. : Ship Priority in appropriate Priority USPS packaging.
- Items shipped Internationally less than 16 oz. : Ship International First Class in white or manila/kraft envelopes.
- Items shipped Internationally over 16 oz.: Ship International Priority in any packaging other than those with USPS noted on it.
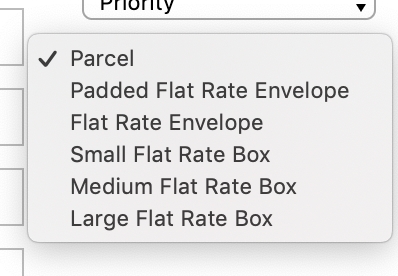
- If shipping in a flat rate box, be sure to select the appropriate category; otherwise select "Parcel".
e.) Click "Calculate Shipping Cost" to verify that the amount seems reasonable for the item being shipped and the shipping method selected.
f.) Click "Create Shipping Labels" at bottom left hand corner followed by "Print Labels"

5.) Printing Shipment Labels
a.) Control + P -> Select printer with portrait layout
b.) Under "More Settings" -> select Margins: None
c.) Make sure all labels have been printed and click "Clear Shipping Preview" at the bottom of the label.
6.) Verify label matches customer's name and address, then place on packaging
7.) Use tape to secure packaging.
8.) Hand items to USPS worker when they come to the store.